How start on your own Pocket Drift RC
Many people have expressed to me how overwhelming the process of building a Pocket Drift RC can be, and I completely understand! When I made my first one, there was little information out there on this hobby; fortunately after learning from my many builds, I will now share with you everything you need to know about these cool little cars!
What you need to get started
In this section I’m going to go over the main components that you will need in order to get started, but not necessarily the materials and such to make some of these things. I will definitely be updating the How-To section soon with those specifics though, so keep an eye out!
There are 2 major sets of items to get a bare bones Pocket Drift RC working:
- Electronics
- Chassis/Steering
For the electronics, pretty much any build you make will need these 5 basic items:
- Servo (for steering)
- Receiver
- ESC (Electronic Speed Controller)
- Motor
- Battery
Servos
Servos are extremely useful for steering, which is what this section will be about, but also keep in mind that these can be used to do all sorts of things, like create pop-up headlights, work hydraulics, etc. I will also be making a How-To about all of the extra things you can do with servos soon! There are two main types of servos that we will be talking about for our micros which are standard servos and linear servos.
- Standard servos

- Linear servos
Standard servos have a bit more torque but at the cost of being slightly larger, heavier, and the fact that the servo arm moves in a circular motion. Because of the extra torque though, I would recommend this type of servo above a linear servo if you have enough room since they tend to last longer. The weaker Linear servo can get stuck and even burn out after a bit of use.
Linear servos really shine when it comes to fitment though. Due to the fact that they are not cased, and that the servo arm moves in a linear motion along the body, you can fit these servos in much tighter spaces. The linear motion of the servo arm is much easier to connect to steering as well since with the standard servo you will have to create a steering system that works with the circular motion of its arm. I will be making a How-To on steering soon where I explain these differences and show you how to build your own steering system based on each servo type!
Receiver

The receiver is what allows your inputs to be relayed to the car. Typically it is connected or “bound” to your transmitter so that when you input a movement like steering or throttle, it receives the input and converts it to signals for your servos and ESC. Since the receiver is directly installed into the car itself, this is the component that usually has a gyro for drift builds. The gyro is able to sense the cars movement and make quick corrections in order to counter-steer and help you keep a steady drift going. Not all receivers have gyros though, so consider what the goals are for your build before jumping in! Most RC receivers are small enough be removed from their housing and placed inside a small car, but there are definitely some brands that offer smaller options than others. This Radiolink receiver is one of the smallest I’ve ever seen and also includes a built in gyro! If you are just making a basic RC and don’t care about drifting, then check out some DasMikro receivers, as they offer even smaller ones. Keep in mind that whatever receiver you decide on will require a compatible transmitter! This Radiolink Transmitter works great with the micro Radiolink receiver previously listed!
ESC
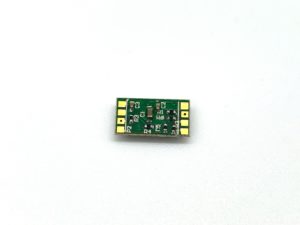
The ESC, or electronic speed controller, is a very important part of the build, as this is how we will actually control the motor speed. This component connects to your receiver so that it can receive throttle inputs from your transmitter/remote. These inputs are converted into varying voltages which are supplied to the motor for precise speed control. Without this your motor would basically be stuck at full speed or off. Since the ESC is simply allowing control of the voltage output, we can even use them for other things like LEDs. For example: If you were to wire an similar voltage LED to the ESC instead of a motor, you would see the LED get brighter and dimmer depending on the amount of throttle you input! Some ESCs like this DasMikro one have built in LED support!
Motor
Finding the right motor can be a difficult task considering the RPM, Gearing/Torque, and size of the motor all factor in. Fortunately I have tested the two most popular micro motors and can tell you a little bit about them! Check out the two types below:
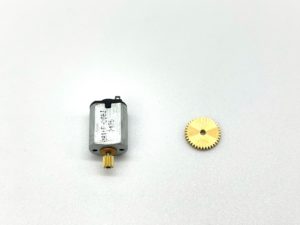
- Standard motor with gear
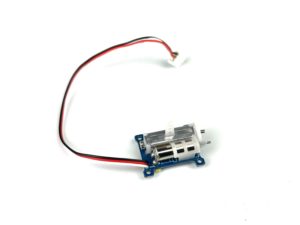
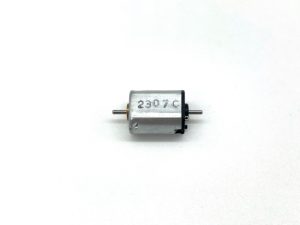
- Dual-shaft motor
The Standard motor is a little more work to get setup, but has more torque due to the gearing involved. Installing it requires mounting the motor and spur gear onto an axle of some sort and also making sure that they mesh properly. This motor runs right around 35,000 RPM at 3V, but after being geared down we get around 8,750 max RPMs and a lot more torque! This is plenty enough to break the wheels loose, and preferred over the dual shaft motor if your RC is going to be pretty heavy. Keep in mind that debris like hair and such are far more likely to get tangled up into this style setup.
The dual-shaft motor is much easier to install as it acts as the axle itself, where you simply mount the wheels on each side. The lack of any gearing keep the motor much more protected from debris, but we also loose quite a bit of torque. It runs around 10,000 RPM at 3V, but don’t be fooled, the lack of gearing makes this motor weaker than the geared motor despite having a faster top end RPM. Personally I prefer this motor due to the simplicity of installation, but I can only recommend it for very light builds. If you intend to use a larger car with a metal chassis for example, you’ll definitely want to go with the geared motor. The lack of torque isn’t always a bad thing though; if you check out my AE86/Hauler video, you will see the use of the dual shaft motor in both applications. The light AE86 has plenty of power with the dual-shaft, while the heavy hauler lags a bit due to lack of torque; this was intended though since I wanted the hauler to appear “heavy”. Its gradual acceleration really adds to the effect that the truck has a lot of weight behind it, where the geared motor might have made the hauler seem a little too quick for something that is supposed to represent such a heavy vehicle.
Chassis
This is the part that most people will probably find the hardest. Making a custom chassis requires many small parts and a good understanding of how steering works. Fortunately I’ve made a pre-built chassis, so those of you who want to skip this step should check it out! Until then, the best way I have found to get started is to simply build onto the base that most diecast cars come with! I usually take the plastic base and remove the front and rear half in order to make room for the steering and motor. Check out below to see what I mean!
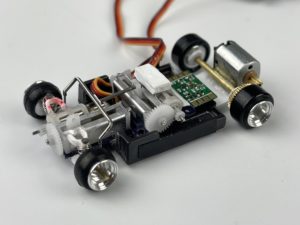
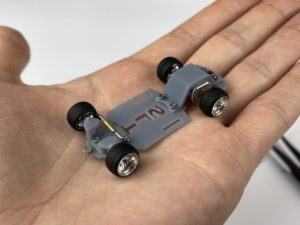
If you want a close look at how I put together my own custom chassis, check out my YouTube channel!
Steering
I will create a How-To on steering soon, but until then I wanted to share the general materials I use to make my steering since many have asked! Throughout each build you will see me working with a white plastic material, as you can see used on the A-arms in the photo above. This material is 1mm thick styrene plastic. I also often get asked where I get all of the tubing for my steering. Most of my builds implement the use of custom 1/64 axles and pins. The brass tubing you see is typically some tubing I have purchased from a company called K&S. As far as springs, I make them myself. I plan to offer these for sale soon!
Thank You!
Thanks for reading! As I have stated, much more information on these things will be coming soon to this How-To section! Steering, wiring, materials, tools, etc. will all be covered in the future. This section will be dedicated to the further explanation of concepts and components shown in my videos, so make sure to follow along!